Availability: Version 2026 Ultimate and Pro editions
Assets let you import structured information about inspected equipment, locations, or other items from a CSV file and associate it with images in a folder. Each CSV row represents one asset. The imported column names become notation categories, and the values in the row become selected notations for the associated image.
Asset information appears with the image's other notations and can be used in reports. Assets are stored in the current folder and apply only to image items in that folder.
Prepare the CSV file
Prepare the file so that:
·the first row contains column names;
·each following non-empty row contains the information for one asset;
·the row order matches the intended image order whenever possible;
·the file uses a semicolon, comma, or tab as the separator and is saved as ASCII or UTF-8.
For example:
Location;Equipment;Asset ID
Building A;Pump 01;P-001
Building A;Pump 02;P-002
Building B;Motor 01;M-001
Import assets
Prerequisite: If the Assets section is unavailable, assign a notations set to the folder.
1.In Organizer or Analyzer mode, open the folder that contains the images.
2.Display the Notations window.
3.Expand the Assets section.
4.Select Import Assets.
5.Select the CSV file.
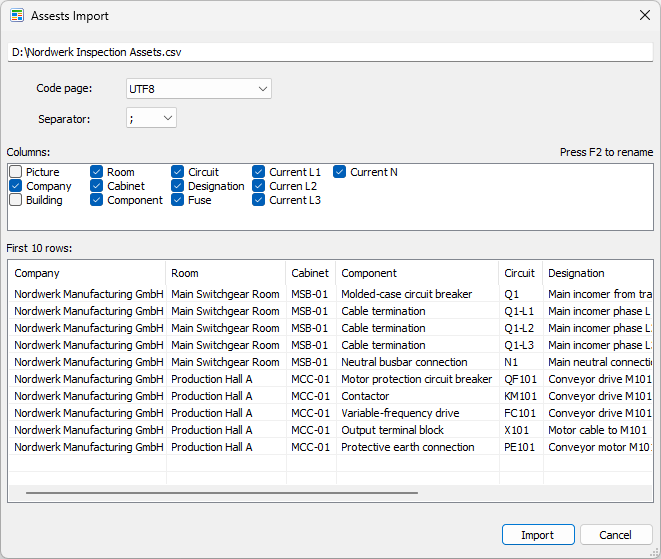
6.Verify the detected code page and separator in the Assets Import dialog.
7.Change the code page or separator if the preview does not show the expected rows and columns.
8.Select the columns to import.
9.Clear the check box for each column that you want to exclude.
10.Select a column that you want to rename.
11.Press F2.
12.Enter the notation category name.
13.Review the first ten rows in the preview.
14.Select Import.
The data is copied into the folder when it is imported. Later changes to the original CSV file are not synchronized automatically.
Automatic asset assignment
By default, IRT Cronista assigns assets to images sequentially: the first asset row is assigned to image T1, the second row to T2, and so on. Automatic assignment follows the current sorted order of image items in the folder and is updated when that order changes.
·If there are more asset rows than image items, the remaining assets are not assigned.
·If there are more image items than asset rows, the remaining images have no asset until you add a manual link.
·An image stack is treated as one image item, so one asset applies to the stack.
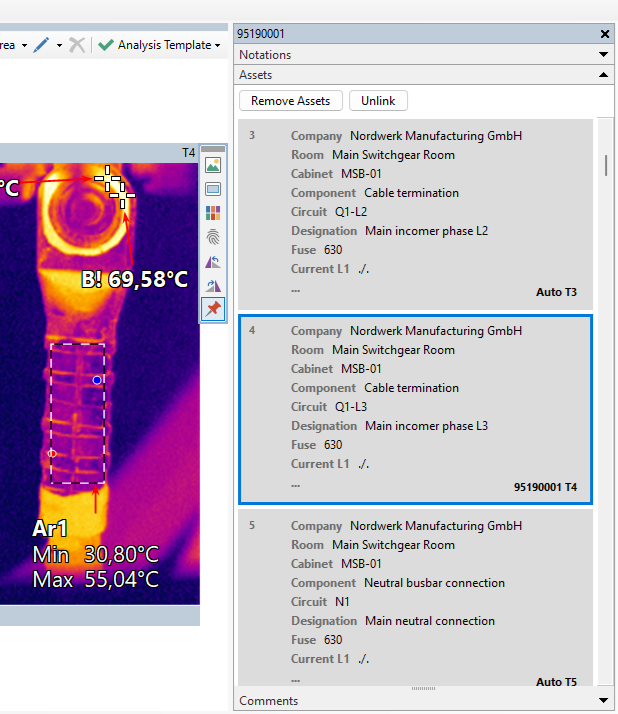
When you select an image, its assigned asset is selected in the Assets section. The label at the bottom of each asset card shows its assignment:
·Auto T1 indicates automatic assignment to image T1;
·Auto T3-T5 indicates that the asset is used by a range of images;
·image name T2 indicates a manual link to the named image;
·No link indicates that the asset is not assigned to an image.
Link an asset to a specific image
Use a manual link when the asset and image orders do not match or when you need to anchor part of the automatic assignment:
1.Select the image.
2.In the Assets section, select the asset that belongs to the image.
3.Select Link.
The manual link becomes an anchor. IRT Cronista automatically assigns the images before, between, and after anchors to the available assets in the same sequence. If a segment contains more images than available assets, its last asset is reused for the remaining images.
Important: Keep manual links in the same order as the assets. If links cross—for example, a later image is linked to an earlier asset—automatic assignment is suspended and only the manually linked pairs are used. Use Clear all links to restore the default sequential assignment. |
To remove one manual link, select the linked asset and select Unlink. The automatic assignment is recalculated immediately.
Update or remove assets
To replace asset data after changing the source CSV file, select Remove Assets.
Confirm the removal, and then import the updated file.
Removing assets deletes the imported asset data and its saved links from the current folder. It does not delete the original CSV file or any images.
Import asset columns into a notations set
You can import the column names from an asset CSV file as empty notation categories. This does not import asset rows or values. Categories that already exist in the notations set are left unchanged.
1.Open the required notations set in the Notations Editor.
2.Right-click a blank area in the editor.
3.Select Import.
4.Select the asset CSV file.
5.Select the columns to add in the Assets Import dialog.
6.Clear each column that you do not need.
7.Press F2 to rename a selected column.
8.Select Import. Each selected column is added at the top level of the set as a multiple-selection notation category.
Tip: Using asset columns in report templates This is especially helpful for a notations set that is linked to or stored in a report template. Importing the asset column names makes the categories available when you configure notation fields and Analysis Info tables in the template. When images are reported, assigned asset values can then fill the corresponding fields or table columns. Use the same category names when importing the asset data into folders. |
Related topics: